
First steps with imgui
In this tutorial you will learn how to use imgui library and how to create your first immediate mode GUI in Python.
What is immediate mode GUI
pyimgui is a Python wrapper around ImGui C++ library that allows you to easily define custom user interfaces no matter what game engine or graphic library you want to use. It is a immediate mode GUI library (opposed to retained mode). In short, retained mode means that there is no general GUI definition for your application but only direct calls that create new windows and widgets or query their state whenever they are needed and on every frame that is rendered.
Actual pipeline of drawing commands is constructed as you go and executed only when you need it. Defining whole GUI on every frame may seem counterintuitive and inefficient. Anyway, such approach is very flexible and allows you to iterate your UI designs very fast.
If you want to learn more about the general philosophy behind this technique watch following video where Casey Muratori thoroughly explains the idea of immediate mode user interfaces:
Using pyimgui
The imgui Python library consists of two main components
The
imgui.coresubmodule. It provides functions that allow you to define new windows and widgets, query their state, and control the GUI context within your application. For the sake of simplicity all public functions fromimgui.coresubmodule are also available in the rootimguinamespace.The
imgui.integrationssubpackage. It provides utilities that allow you to easily integrate ImGui with popular Python frameworks and engines.
Basic GUI drawing loop
Despite being an immediate mode GUI library ImGui doesn’t draw immediately
anything every time you call any function from imgui.core module.
Calls to the window and widget functions just create new entries in the list
of drawing commands to be executed during next frame rendering. You alone
decide when to start new frame context and when to execute all drawing
commands.
Following is the basic rendering loop as its simplest:
import imgui
# initilize imgui context (see documentation)
imgui.create_context()
imgui.get_io().display_size = 100, 100
imgui.get_io().fonts.get_tex_data_as_rgba32()
# start new frame context
imgui.new_frame()
# open new window context
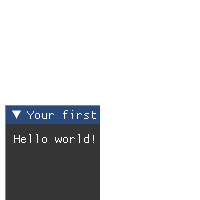
imgui.begin("Your first window!", True)
# draw text label inside of current window
imgui.text("Hello world!")
# close current window context
imgui.end()
# pass all drawing comands to the rendering pipeline
# and close frame context
imgui.render()
imgui.end_frame()
Of course this is not enough to create fully working GUI application with
pyimgui. The bare imgui.core module is not able to render anything
on its own. The imgui.render() function just passes abstract ImGui
drawing commands to your rendering backend. In order to make it work you will
first have to initialize the rendering backend of your choice.
Using built-in rendering backend integrations
The imgui.integrations sub-package provides multiple modules that
aim to ease integration with various Python rendering engines, frameworks,
and libraries:
imgui.integrations.cocos2dintegrates pyimgui with Cocos2d game engine.imgui.integrations.glfwintegrates pyimgui with GLFW OpenGL windowing library through glfw Python package .imgui.integrations.pygameintegrates pyimgui with pygame game engine.imgui.integrations.sdl2integrates pyimgui with SDL2 library through PySDL2 Python packageimgui.integrations.pygletintegrates pyimgui with pyglet library, both stable (1.5.x) and development versions (2.x), switching between fixed and programmable as appropriate.imgui.integrations.openglprovides bare integration with OpenGL both in fixed pipeline and programmable pipeline mode. It does not provide any windowing facilities (so cannot be used as a standalone renderer) but serves as a good starting point for new custom integrations with other OpenGL-based frameworks and engines. It is based on PyOpenGL library.
Note that pyimgui does not include any of integrated backend requirement
during installation as default. Still it is possible to install all additional
requirements using setuptools extras feature. Just specify your integration
submodule name for backend of your choicse as an extra tag during imgui
installation with pip install command e.g.:
$ pip install imgui[sdl2]
$ pip install imgui[pygame]
If you want you can install pyimgui with multiple backends at once:
$ pip install imgui[glfw,cocos2d,pygame,sdl2,pyglet]
You can even request to install all requirements for every supported backend
and every optional feature using single full extras option:
$ pip install imgui[full]
For actual examples of using these backends see the doc/examples directory of the project page on GitHub.